Finding the right carpenter ant treatment comes down to one thing: eliminating the colony, not just the ants you see. If you only spray the foragers on your counter or window sill, you usually kill a small fraction of the nest and push the rest deeper into walls or wood. This guide shows how to confirm you’re dealing with carpenter ants, how to judge how serious the infestation is, and how to combine baits, non-repellent products, and targeted nest treatments so you can stop the problem at its source.
Quick Answer: What’s the most effective carpenter ant treatment?
The most effective carpenter ant treatment is a slow-acting bait strategy combined with targeted nest treatment (dust or foam) once the nest or void is identified. That approach works because carpenter ant workers share food with nestmates (including queens and larvae), so the active ingredient spreads through the colony over time.
Use this quick checklist:
- Best first step (most homes): Place slow-acting bait stations along trails for 2-4 weeks.
- Best “colony-level” add-on: Use a non-repellent perimeter treatment at entry points (foundation, door thresholds).
- Best when the nest is located: Inject insecticidal dust or foam into wall voids or galleries.
- Avoid early mistakes: Don’t spray repellent aerosols on trails before baiting – it can scatter ants and reduce bait pickup.
- When to call a pro: Repeated swarms indoors, heavy frass, or ants emerging from multiple rooms.
How to identify carpenter ants (and confirm you need treatment)
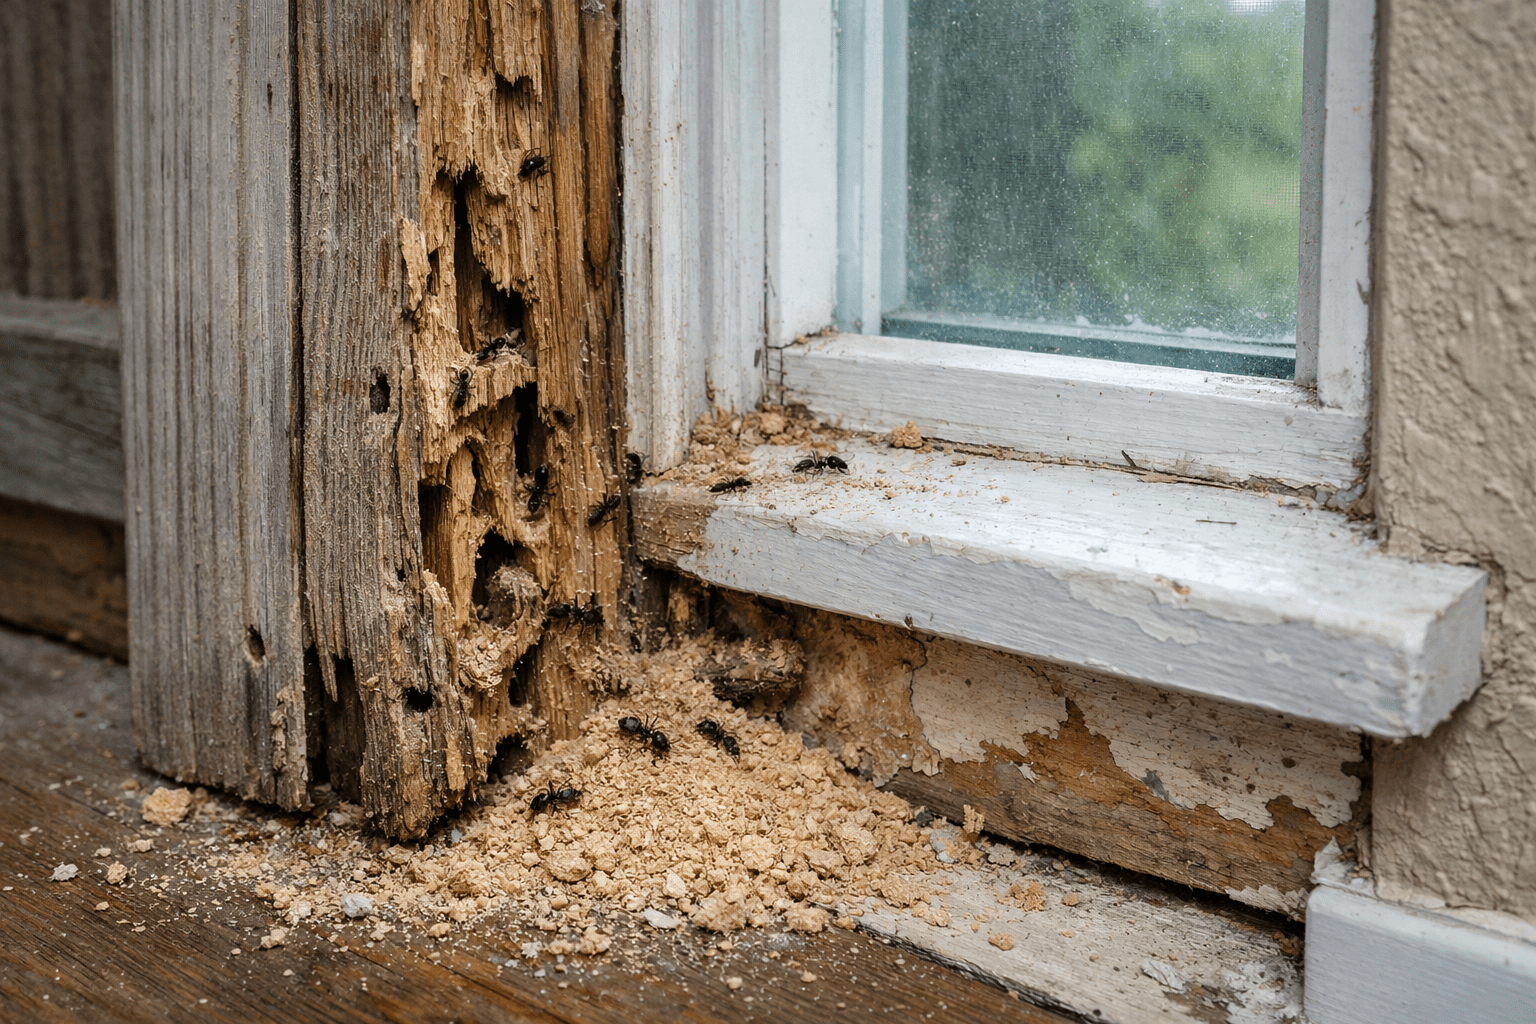
Carpenter ants (Camponotus spp.) create problems because they excavate wood to build nesting galleries, especially in moist or decaying areas. They don’t eat wood the way termites do, but their tunneling can still become a structural issue over time. The trick is that many infestations are partly hidden – you might only see a few workers while the main nest stays out of sight.
According to the North Carolina State Extension guide on carpenter ants, carpenter ants commonly nest in damp wood and wall voids, which is why plumbing leaks, roof leaks, and wet window frames often show up in the same inspection.
Quick ID checklist (size, color, and clues)
Use this table to avoid treating the wrong ant:
| Sign | What you may notice | What it usually means |
|---|---|---|
| Worker size | 1/4 to 1/2 inch (6-13 mm), often black or black with reddish tones | Carpenter ant workers are typically larger than many “kitchen ants” |
| Frass | Sawdust-like debris mixed with insect parts | Ants are excavating galleries nearby |
| Sounds | Faint rustling in walls at night | Activity inside voids or wood |
| Swarmers | Winged ants indoors (often spring) | A mature colony may be nearby |
Minor vs. moderate vs. severe: a practical severity check
Severity helps you choose the right approach:
- Minor: Fewer than ~20 ants/day, no frass.
- Moderate: 20-50 ants/day and/or frass appears.
- Severe: Heavy daily activity, multiple areas involved, swarmers indoors, or visible wood moisture damage.
What to do today (actionable next step)
Before you buy anything, do one evening check:
- Wait until dusk (carpenter ants often forage more actively then).
- Use a flashlight to follow trails from kitchens, bathrooms, or basements toward edges, pipes, or window trim.
- Mark suspect areas with painter’s tape so you can place baits precisely later.
Carpenter ant treatment plan (step-by-step) that targets the colony
Raid Ant and Roach Killer, 17.5 oz
Raid Ant and Roach Killer 17.5 oz earns a strong 4.6-star rating from over 12,400 Amazon reviews for its reliable contact and residual kill on ants and roaches, making it a top choice for household pest control. Users praise its effectiveness and ease of use, though the potent odor is a common drawback—ideal for quick infestations but ventilate well during application.
If carpenter ants were a “company,” the ants you see are the delivery drivers, not the decision-makers. Only a portion of the colony forages outside the nest, so killing visible ants rarely ends the problem. That’s why most university and extension recommendations focus on getting the active ingredient back to the brood and queens, not wiping out a few workers on the surface.
The University of Georgia’s carpenter ant management publication emphasizes that successful control depends on locating nests when possible and using methods that reach ants inside galleries and voids.
Step 1: Start with baits (before sprays)
Slow-acting baits are often the backbone of DIY success because workers carry bait back and share it through food exchange. Expect results in 2-4 weeks if placement and product choice are right.
Bait placement checklist (most effective setup):
- Put baits directly along trails or where ants “funnel” (under sink pipes, along baseboards, near window frames).
- Place multiple small stations instead of one large pile.
- Keep baits undisturbed – don’t clean over trails with strong cleaners for a few days.
- If ants ignore it after 48-72 hours, switch bait type (sweet vs. protein-based).
For a deeper comparison of bait formats and active ingredients, see InsectoGuide’s best ant killers and baits, which breaks down when gels, stations, and granules work best.
Step 2: Add a non-repellent perimeter and entry-point treatment
Once baits are in place, a non-repellent treatment around likely entry points helps reduce new foragers and can spread through contact. Non-repellents are useful because ants don’t detect and avoid them as easily as “strong-smelling” repellent sprays.
Where to focus (simple perimeter map):
- Foundation line (especially where siding meets concrete)
- Door thresholds and garage door corners
- Window frames and weep holes
- Utility penetrations (AC lines, cable entries)
If you’re dealing with outdoor foraging and trails around patios, mulch, or landscape timbers, InsectoGuide’s outdoor ant control methods can help you choose products that make sense for lawns and gardens.
Step 3: Treat the nest directly if you can confirm it
When you can identify a nest location (or a consistent wall void), direct treatment speeds results. Dusts and foams are commonly used because they can reach into galleries.
The University of Nebraska Extension carpenter ant guide recommends careful application of insecticidal dusts into voids and emphasizes avoiding inhalation and following label directions.
Direct-treatment options (quick comparison):
| Method | Best for | Why it works | Common mistake |
|---|---|---|---|
| Insecticidal dust | Wall voids, dry galleries | Clings to ants and spreads through contact | Overapplying or blowing dust into living spaces |
| Foam products | Voids and galleries you can access | Expands to fill spaces and contact ants | Using foam without confirming a void/nest |
| Aerosol crack-and-crevice | Small accessible spots | Quick knockdown in tight areas | Relying on it alone (rarely colony-level) |
Safety notes (don’t skip):
- Wear a mask/respirator if label requires it, especially with dusts.
- Keep children and pets away until products are dry and secured.
- Never apply pesticides in ways not listed on the label.
Best baits and active ingredients (and why slow-acting wins)
Terro T300B Liquid Ant Bait, 12 Baits
This slow-acting bait is effective for eliminating carpenter ant colonies by allowing the active ingredient to spread through the colony, aligning with the article’s recommended strategy.
Many homeowners expect instant results, but carpenter ant control works better when it’s a slow, steady chain reaction. A fast “kill-on-contact” spray can stop a trail temporarily, yet it often fails to reach queens and brood. Slow-acting baits are designed for transfer – workers feed, return, and share.
Entomologists and pest management educators commonly recommend baiting because it aligns with ant biology. The North Carolina State Extension resource highlights that carpenter ants often nest in hidden locations, making colony-targeted approaches more reliable than surface-only treatments.
What to look for in a bait (simple buying guide)
A good carpenter-ant bait should be:
- Slow-acting (so workers have time to share it)
- Palatable (ants actually feed on it)
- Protected (stations reduce drying out and keep kids/pets safer)
Common active ingredients used in ant baits include ingredients such as fipronil, indoxacarb, hydramethylnon, and borate/boric-acid based options. Product availability varies by region, and labels differ, so always match the product to your use site (indoors vs. outdoors).
Sweet vs. protein baits: which do carpenter ants prefer?
Carpenter ants can switch preferences based on season and colony needs.
Try this decision rule:
- If you see ants in kitchens, near fruit, or on sugary spills, start with a sweet bait.
- If you see ants near pet food, grease, or dead insects, try a protein/fat-based bait.
Mini test (fast and useful):
- Put a pea-sized dab of honey on one index card and a tiny smear of peanut butter on another.
- Place both near the trail (out of reach of kids/pets).
- Check after 30-60 minutes to see which attracts more ants, then choose a bait type accordingly.
Homemade borax bait: when it helps (and when it doesn’t)
DIY borax/boric acid baits can help with minor activity, but they’re harder to dose correctly than commercial baits. Too strong and ants avoid it. Too weak and results drag on.
If you use a homemade option, keep it conservative and contained:
- Use small amounts in shallow containers.
- Place out of reach of children and pets.
- Avoid “extra strong” mixes that can reduce feeding.
If you prefer non-chemical deterrence for prevention (not colony elimination), InsectoGuide’s natural ant repellents covers options like sanitation steps, barrier materials, and low-toxicity approaches.
Nest location, moisture fixes, and prevention (the part most people skip)
Hot Shot Bed Bug and Flea Killer, 16 oz
Hot Shot Bed Bug and Flea Killer provides quick knockdown of adult bed bugs, fleas, and other pests via active ingredients prallethrin and gamma-cyhalothrin, suitable for spot treatments on indoor surfaces, but lacks an IGR for preventing flea reproduction, making it less effective for long-term control compared to alternatives like Precor 2000 Plus[1].
Even the best products struggle if the home keeps offering perfect nesting conditions. Carpenter ants love moisture problems because damp wood is easier to excavate and often already starting to decay. Think of moisture as the welcome mat.
The University of Georgia publication on carpenter ant biology and management points to moisture-damaged wood as a common nesting site, which is why repairs and habitat changes are not optional if you want lasting results.
Where carpenter ant nests hide (indoor and outdoor)
Use this checklist to guide your inspection:
Common indoor nest zones
- Under sinks and around plumbing penetrations
- Behind dishwashers and refrigerators (condensation)
- Window sills and door frames with past leaks
- Attics near roof leaks or bathroom vent moisture
- Wall voids near baseboards where trails appear nightly
Common outdoor nest zones
- Rotting stumps and logs
- Landscape timbers and wood mulch against the foundation
- Hollow trees (ants can forage indoors from nearby trees)
- Wood piles stored against the house
Moisture and exclusion fixes that actually reduce reinfestation
Prioritize these in order:
- Fix active leaks (pipes, roof flashing, dripping hose bibs).
- Improve ventilation in damp basements/crawlspaces (dehumidifier, venting where appropriate).
- Replace water-damaged wood (especially around windows/doors).
- Trim vegetation away from siding and rooflines.
- Seal entry points with caulk around utility lines and gaps.
Quick prevention scorecard (self-audit):
- Wood-to-soil contact near foundation: Yes/No
- Mulch touching siding: Yes/No
- Firewood stacked against house: Yes/No
- Dripping plumbing or condensation: Yes/No
- Tree branches touching roof: Yes/No
Each “Yes” is a realistic reinfestation pathway.
Outdoor colony and mound-adjacent issues
Carpenter ants don’t build classic soil mounds like some ants, but outdoor colony management still matters because foragers often originate outside. If you’re also battling mound-forming ants in the same yard, see InsectoGuide’s ant mound treatments to avoid mixing strategies that work against each other.

Common mistakes and when to call a professional
Carpenter ant control fails most often because people treat what’s visible, not what’s real. The visible ants are evidence, but the nest is the target. If you correct a few common missteps, DIY success rates climb quickly for minor to moderate infestations.
The top mistakes that slow down carpenter ant control
Mistake 1: Spraying trails before baiting
Repellent sprays can cause ants to avoid the area, split activity, or move deeper into voids. Baits work best when ants feel safe traveling.
Mistake 2: Expecting overnight results from baits
Colony elimination typically takes weeks, not hours. If you see reduced activity after 7-10 days, that’s progress.
Mistake 3: Not switching bait types
If a bait isn’t being eaten, it isn’t working. Carpenter ants can change preferences, so rotate between sweet and protein-based options.
Mistake 4: Skipping moisture repairs
Without moisture control, you can remove one colony and invite another. Damp wood is prime real estate.
Mistake 5: Treating one spot when there are satellite nests
Carpenter ants can form satellite nests. That’s why wider bait placement and consistent monitoring matters.
When professional treatment is the smarter move
Consider a licensed professional if any of these are true:
- You see winged swarmers indoors, especially repeatedly.
- Frass piles keep reappearing in the same area after treatment.
- Ants are active in multiple rooms or across multiple floors.
- You suspect a nest in a hard-to-access area (chimney void, complex wall cavities).
- There’s visible moisture damage and you want a combined pest and building assessment.
A pro can use tools like moisture meters, wall-void inspection methods, and targeted injection equipment to reach nests without unnecessary demolition.
Quick “do this, not that” recap (snippet-friendly)
- Do: bait first and keep trails active
- Not that: blast trails with repellent spray
- Do: treat entry points with non-repellent products after baiting starts
- Not that: rely on contact killers alone
- Do: fix leaks and replace damaged wood
- Not that: assume pesticides solve a moisture problem
Conclusion
A successful carpenter ant treatment targets the colony with slow-acting baits, supports that effort with non-repellent entry-point control, and uses dust or foam when you can confirm a nest or wall void. Just as important, fixing moisture and sealing entry routes helps prevent repeat infestations.
Next step: spend one evening following trails at dusk, then place baits where ants already travel. For product selection and strategy comparisons, review InsectoGuide’s best ant killers and baits and, if outdoor activity is a big part of your problem, the outdoor ant control methods guide.
As an Amazon Associate, I earn from qualifying purchases. Product recommendations are based on real reviews and independent research.