Finding the best cricket keepers comes down to one thing: keeping feeder crickets alive, clean, and easy to dispense so your reptile gets consistent meals. A good keeper cuts down escapees, odor, and die-offs, and it makes gut-loading and dusting simpler so nutrition stays on track. This guide breaks down what to buy (and what to avoid), how to set it up in 10 minutes, and which supporting supplies actually matter for reptile feeding.
Bottom line: The best cricket keeper is dry, escape-resistant, easy to clean, and sized for 7-14 days of feeder crickets. Ventilation and moisture control matter more than a fancy enclosure.
- Use smooth sides, tight lids, egg crate, dry food, and water gel.
- Buy fewer crickets more often if odor or die-offs are common.
- Gut-load 24-48 hours before feeding and dust right before feeding.
Quick answer
The best cricket keepers are smooth-walled, well-ventilated containers with a secure lid and an easy way to transfer crickets (tubes, ports, or removable cartons). Choose size based on how many crickets you use in 7-14 days.
- Best overall features: fine-mesh ventilation, tight latch, smooth interior, removable transfer tubes or “dump-and-pour” access
- Best size for most homes: a medium keeper holding about 250-500 crickets
- Best setup inside: vertical egg cartons, dry gut-load in a dish, and water gel or moisture veggies (no open water)
- Best routine: gut-load 24-48 hours before feeding, then dust right before offering to your reptile
- Avoid: damp substrate, crowded tubs, and small air holes that trap humidity (odor and mold follow)
Best cricket keepers
A “cricket keeper” is really a tiny life-support system. Crickets breathe through spiracles along their body, and stale, humid air builds up fast in cramped containers. That is why the best keeper is not the fanciest one. It is the one that stays dry, ventilated, and easy to clean.
Research on feeder insect nutrition and reptile husbandry consistently points to the same basics: ventilation, space, and hygiene reduce mortality and disease risk, while gut-loading and supplementation correct nutrient gaps. Standard references used by reptile veterinarians, such as Current Therapy in Reptile Medicine and Surgery from Elsevier, emphasize that feeder insects must be managed like part of the diet, not just “stored” until feeding time (see the nutrition guidance summarized in Elsevier’s reptile medicine text information).
What “best” means in real life
Use this checklist when shopping. If a keeper misses two or more items, expect smell, die-offs, or constant escapes.
Cricket keeper must-haves
- Smooth, tall walls: crickets cannot grip and climb out
- High airflow lid: mesh or large vent panels (not a few pinholes)
- Secure closure: snaps or latches that do not warp over time
- Easy transfer method: tubes, side ports, or a wide opening that pours cleanly
- Easy cleaning: minimal seams and corners where frass sticks
Nice-to-haves
- Clear sides for quick headcounts
- Stackable shape for multiple sizes (small, medium, large feeders)
- Dishwasher-safe plastic (top rack) if the manufacturer allows it
Product-style options (how to choose)
Rather than chasing a single brand, match the keeper type to your routine.
Option A: Tube-style cricket keeper (classic design)
- Best for: weekly pet-store cricket runs, quick dispensing into a tank
- Pros: fast transfers, fewer escapes during feeding
- Cons: tubes get dirty, and lids vary in ventilation quality
- Use tip: dedicate one tube for “gut-loaded ready to feed” crickets
Option B: Ventilated tote DIY keeper
- Best for: anyone wanting more capacity for less money
- Pros: excellent airflow if you cut large vent windows and add mesh
- Cons: not as “grab-and-go” unless you add a transfer cup
- Use tip: choose a tote with very smooth walls and a rigid lid
Option C: Modular tub system
- Best for: multi-reptile households, keeping different sizes separated
- Pros: organized, scalable, easier quarantine of new batches
- Cons: costs more upfront
- Use tip: label tubs by size and purchase date to rotate stock
Quick comparison cards (mobile-friendly)
-
Small keeper
- Best for: 1 leopard gecko or small lizard
- Capacity: about 50-250 crickets
- Watch out: dries out fast, overcrowds easily
- Next step: buy smaller, more frequent batches
-
Medium keeper
- Best for: most reptile owners
- Capacity: about 250-500 crickets
- Watch out: needs consistent cleaning to prevent ammonia smell
- Next step: keep a second small “gut-load now” container
-
Large keeper
- Best for: multiple reptiles or bulk orders
- Capacity: 500+ crickets
- Watch out: heat and humidity spike from crowding
- Next step: split into two containers immediately
Actionable takeaway: If your keeper smells strongly of ammonia, treat it like a ventilation and crowding problem first, not a “crickets are gross” problem.
Setup and care
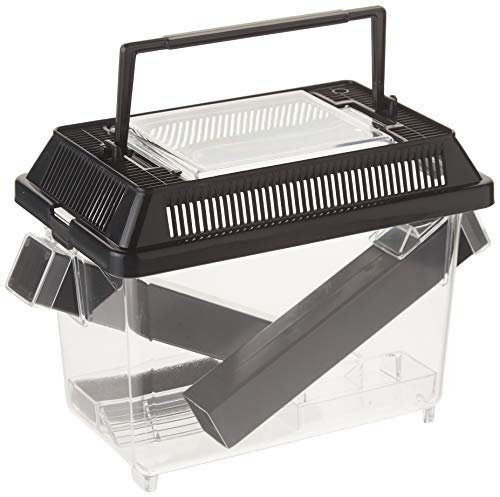
This cricket keeper provides a secure and ventilated environment for crickets, making it easy to manage and dispense them for reptile feeding.
- Makes feeding crickets to reptiles much neater and easier thanks to the removable dispensing tubes
- Compact, well‑ventilated design with included food and water dishes keeps small numbers of crickets alive and contained
- Convenient size for hobbyists who need to store or transport modest quantities of crickets (up to ~20 adults) without escapes
- Capacity is limited and can be too small for users who keep larger numbers of feeder crickets
- Plastic construction and lid/tube fit can feel flimsy, leading some users to report occasional escapees if not handled carefully
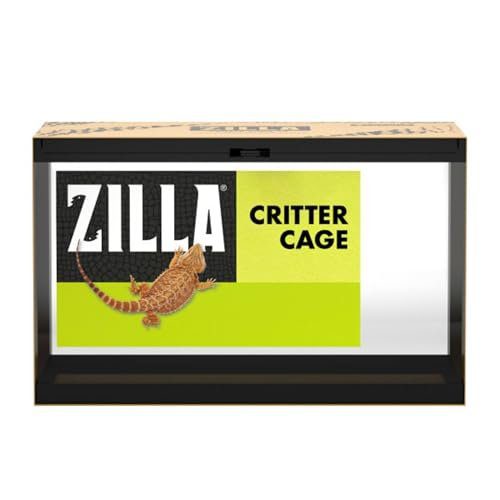
A roomier glass holding container for reptile owners who buy larger feeder-cricket batches and want easier cleaning than a small plastic keeper.
- Roomier than a small cricket pen for short-term holding
- Secure screen top helps with airflow and escape control
- Glass walls wipe clean more easily than textured plastic
- Larger footprint than most feeder-cricket keepers
- Still needs egg crate, dry food, and water gel added separately
Most cricket problems start in the first 24 hours after purchase. They arrive stressed, often chilled or overheated, and they dehydrate quickly. A clean setup with dry airflow is the difference between “they all died” and “they lasted two weeks.”
Entomology-based rearing methods for house crickets (Acheta domesticus) have long emphasized temperature control, ventilation, and dry conditions for survival. Classic rearing protocols from the Entomological Society of America describe husbandry approaches built around airflow, cleanliness, and stable warmth, which translate well to feeder-cricket storage.
Step-by-step keeper setup (10 minutes)
-
Place the keeper in a stable spot
- Aim for 75-85°F (24-29°C) for holding.
- Keep it out of direct sun and away from AC vents.
-
Add interior structure
- Use egg cartons or cardboard flats, stacked vertically or at an angle.
- This increases surface area and reduces stress and cannibalism.
-
Add food in a dish
- Put dry gut-load in a shallow lid or ramekin.
- Keeping food off the floor reduces mold and frass contamination.
-
Add safe hydration
- Use water gel crystals or moisture-rich vegetables.
- Avoid open water dishes. Crickets drown, and the water turns foul quickly.
-
Add ventilation check
- If condensation appears on walls, you need more airflow or fewer crickets.
Maintenance schedule that actually works
Crickets are like tiny composters. Waste (frass), shed skins, and dead insects build up fast. Odor is usually ammonia from waste plus humidity.
Daily (2 minutes)
- Remove dead crickets.
- Pull out any wet or molding food.
Weekly (10-15 minutes)
- Transfer live crickets to a temporary container.
- Dump frass and replace egg cartons.
- Wipe the keeper with warm water and mild soap.
Every 2-4 weeks (as needed)
- Disinfect, then rinse and dry completely.
- Many keepers use diluted bleach or chlorhexidine products, but always follow label directions and keep fumes away from pets.
Common mistakes (and fixes)
Mistake: adding substrate (coconut fiber, soil, sand)
- Why it fails: traps moisture, grows mold, and makes cleaning harder
- Fix: bare bottom plastic is best for holding crickets
Mistake: overcrowding
- Why it fails: more heat, more humidity, more cannibalism
- Fix: split large batches into two keepers immediately
Mistake: tiny air holes
- Why it fails: humidity rises, bacteria and fungi thrive
- Fix: use a lid with mesh or large vents
Actionable takeaway: If you want fewer escapes, do not reduce ventilation. Improve your transfer method instead (tubes, a wide-mouth pour, or a catch cup).
Gut-loading and dusting
Here is the uncomfortable truth: a cricket can be perfectly alive and still be poor nutrition. Un-supplemented crickets are low in calcium and tend to have a calcium-to-phosphorus ratio that is the wrong direction for many reptiles. That is why experienced keepers treat gut-loading and dusting as part of feeding, not optional extras.
A foundational review in the Journal of Zoo and Wildlife Medicine discussed how insect diets and gut-loading affect captive reptile nutrition, and why feeder insects often need targeted supplementation. Nutrient composition work in Zoo Biology has also documented how feeder insect nutrient profiles vary and how diet changes can improve them.
Gut-loading: what to do in the 24-48 hours before feeding
Gut-loading means feeding crickets a nutrient-dense diet right before they become food. Done correctly, it measurably improves mineral content, including calcium.
Simple gut-load plan
- Time window: 24-48 hours before feeding
- Base: quality commercial gut-load or a balanced dry mix
- Add fresh moisture foods: carrot, sweet potato, squash, collard greens, dandelion greens
- Avoid as staples: spinach and beet greens (higher oxalates can bind calcium)
Visual checklist: gut-load station
- Shallow dish for dry gut-load
- Separate spot for moisture veggies
- Egg carton stack kept dry
- No standing water
- No wet substrate
Actionable takeaway: Keep a small “ready-to-feed” group in a separate tub. It prevents your whole colony from living on moist foods that spoil.
Dusting: when and how
Dusting works because the powder sticks briefly to the cricket’s exoskeleton. If you dust hours early, much of it falls off.
Best practice
- Dust right before feeding
- Use a small cup or bag, add a pinch of powder, shake gently for a few seconds
- Feed immediately
Supplement basics (general guidance)
- Calcium without D3: common choice when reptiles have strong UVB lighting
- Calcium with D3: often used when UVB is weak or absent, but avoid overuse
- Multivitamin: typically 1-2 times per week, not every feeding
Because needs vary by species, age, and lighting, follow your reptile veterinarian’s plan. Field and captive UVB exposure research in Zoo Biology highlights why lighting and supplementation must be coordinated rather than guessed.
Myth check: “Crickets are a complete food”
Crickets are a great feeder, but not a complete one by default.
What to remember
- Crickets are naturally low in calcium
- Gut-loading can raise calcium significantly compared to grain-only diets
- Dusting is still important, especially for juveniles and fast-growing reptiles
Actionable takeaway: If you change nothing else, change this: gut-load for 24-48 hours, then dust right before feeding.
Useful supplies
A cricket keeper is the hub, but a few supporting tools make feeding cleaner and safer. The goal is fewer escapes in the house, less stress for your reptile, and better nutrition delivery.
1) Feeding tongs or tweezers
If you have ever had a reptile lunge at your fingers, you already understand the value.
What to look for
- 10-12 inch length for reach
- Blunt or soft tips to avoid mouth injuries
- Easy-to-clean metal or durable plastic
Best use cases
- Shy geckos that need controlled presentation
- Animals on a feeding schedule where you want exact counts
- Handling larger crickets that bite or kick free
2) Escape-resistant feeding dishes
Crickets are built to roam. A smooth-sided dish keeps them contained long enough for your pet to hunt.
Dish features that work
- Inward-curving lip
- Smooth interior surface
- Wide base so it does not tip
Visual: quick dish test
- If a cricket can climb it in 10 seconds, it is not a cricket dish.
- If your reptile cannot see into it, it is too deep.
3) Supplement storage and a “dusting cup”
Supplements degrade with heat and humidity. Keep them sealed and dry.
Simple system
- One labeled container for calcium
- One labeled container for multivitamin
- One dedicated dusting cup with a lid
4) Cleaning kit for feeder insects
Cricket frass and shed skins can irritate allergies in some people. A small kit keeps things tidy.
Keep nearby
- Disposable gloves (optional)
- Small scoop or plastic spatula
- Paper towels
- A dedicated brush and dustpan
5) Environmental controls
Stable warmth keeps crickets active and eating. Overheating kills them fast.
Useful controls
- A basic thermometer near the keeper
- A thermostat if you use any heating device nearby
Why this belongs on InsectoGuide
Feeder insects are not household pests, but the same rules apply: control the environment, reduce attractants, and keep things clean. If you are also dealing with biting insects in the home or yard, InsectoGuide’s practical guides can help you handle those problems without confusion, including How to Get Rid of Fleas: Complete Removal Guide, Best Mosquito Repellents: DEET, Picaridin & Natural Options, Best Bug Zappers for Mosquitoes: Indoor & Outdoor, and Best Mosquito Bite Relief Products: Bug Bite Thing & More.
Actionable takeaway: Set up your cricket area like a mini “feed prep station.” When tools are within reach, you feed more consistently and waste fewer crickets.

Odor, die-offs, and disease
If your crickets keep dying, it is tempting to blame the supplier. Sometimes that is true, especially with disease events in commercial cricket production. But in most homes, the cause is a predictable trio: humidity, crowding, and spoiled food.
Crickets can carry pathogens and parasites that become more likely when hygiene slips. Reptile medicine references discuss parasites such as oxyurid pinworms and other organisms that can spread when feeder insects and enclosures are not managed cleanly (see parasite overviews in major veterinary references like CRC Press reptile pathology texts). There have also been well-documented viral issues in house cricket production, including densoviruses that contributed to large die-offs and changes in which cricket species farms raise (background on densoviruses is discussed in microbiology literature such as AIMS Microbiology).
Troubleshooting: symptoms and fixes
Problem: strong ammonia smell
- Likely causes: overcrowding, wet food on the floor, poor airflow
- Fix
- Split the colony into two containers
- Replace cartons
- Increase ventilation
- Feed only in dishes
Problem: crickets dying in piles
- Likely causes: overheating, damp conditions, poor ventilation, contaminated food
- Fix
- Verify temperature with a thermometer
- Remove all moist foods for 24 hours and reintroduce in smaller amounts
- Clean and dry the container completely
Problem: mold
- Likely causes: moisture veggies too large or left too long
- Fix
- Use smaller pieces
- Replace daily
- Keep them in a dish, not on the floor
Problem: constant escapes
- Likely causes: lid gaps, warped plastic, transfer method too chaotic
- Fix
- Replace lid or keeper
- Transfer using a tube, funnel, or catch cup inside a larger bin
When to consider professional help
If your reptile shows signs of illness (weight loss, abnormal stool, lethargy, jaw softening, tremors), do not assume it is “just feeders.” Work with a reptile veterinarian. Nutrition issues like calcium imbalance can become metabolic bone disease, and parasites require testing and treatment.
Actionable takeaway: Treat every new cricket batch like a “quarantine.” Keep it separate for 48 hours, watch for die-offs, then combine only if healthy.
Final verdict
The best cricket keepers are the ones that stay dry, ventilated, and easy to dispense. Pair that keeper with a simple routine: vertical egg cartons, food and moisture in dishes, daily dead removal, and a weekly cleanout. Then make nutrition non-negotiable by gut-loading for 24-48 hours and dusting right before feeding.
Next step: set up a two-container system (holding tub + gut-load tub). It is the fastest way to reduce odor and improve nutrition. For other insect-related home concerns, keep InsectoGuide bookmarked, especially How to Get Rid of Fleas: Complete Removal Guide and Best Mosquito Repellents: DEET, Picaridin & Natural Options.