If you’re wondering how to start beekeeping, the safest path is simple: learn your local seasonality, start with two colonies, and plan from day one to monitor and manage Varroa mites. Most first-year problems are not mysterious – they come from starvation during comb-building, poor queen performance, or mites left unchecked until late summer. This guide walks you through equipment, hive placement, choosing bees, and a realistic first-year plan so your colony can build up, overwinter well, and eventually produce surplus honey.
Quick answer: how to start beekeeping (beginner checklist)
To start beekeeping successfully, aim for a small, manageable setup and follow a repeatable routine.
Beginner beekeeping starter plan (fast overview)
- Start with 2 hives (not 1) so you can compare and swap resources if needed.
- Use the common local hive style (often Langstroth) to match mentors and equipment supply.
- Place hives in morning sun on dry ground, slightly tilted forward, with a safe flight path.
- Install bees in spring (often March-May in temperate areas) and feed 1:1 syrup if nectar is scarce.
- Monitor Varroa starting early summer using an alcohol wash or sugar roll. Treat based on thresholds.
- First-year goal: build a strong brood nest and winter stores – surplus honey is a bonus.
Want gear shortcuts? See InsectoGuide’s picks for Best Beekeeping Starter Kits for Beginners.
Why beekeeping matters (and what it really involves)
People often start with a romantic picture: a hive in the backyard, a little honey, and “helping the bees.” Then the first inspection happens and reality shows up – sticky propolis, heavy boxes, and thousands of insects making rapid decisions without your permission.
That’s not a bad thing. It’s the point.
Honey bees (western honey bee, Apis mellifera) are livestock with wild instincts. A colony expands, swarms, stores food, and defends its home whether you’re ready or not. Successful beekeeping is mostly about good animal care: giving bees a dry cavity, enough food, and keeping parasites below damaging levels.
Here’s the bigger context. Research summarized in the IPBES Pollinators Assessment estimates insect pollination contributes US$235-577 billion per year globally. A classic review in Proceedings of the Royal Society B reported that pollinators affect about 75% of leading global food crops to some degree, especially fruits, nuts, and vegetables.
What beekeeping is (and is not) in 2026
| What beginners expect | What experienced keepers focus on |
|---|---|
| “Harvest honey” | “Build a healthy colony first” |
| “Check the hive often” | “Inspect with a purpose, then close it up” |
| “Natural means no treatments” | “Monitor Varroa and act before damage shows” |
| “One hive is enough” | “Two hives makes learning and recovery easier” |
Actionable takeaway: Before buying bees, decide how you’ll handle two realities: Varroa mites and seasonal food gaps. Everything else is secondary.
Beekeeping equipment and hive types: what you actually need (and what can wait)
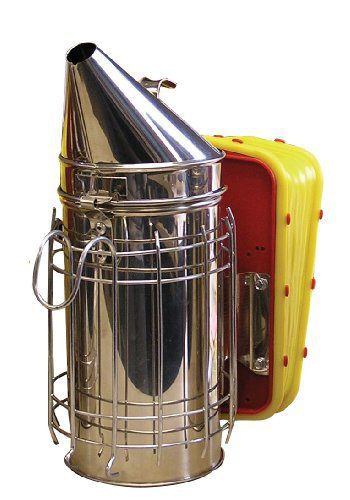
Mann Lake Stainless Steel Bee Smoker Pro Bellow, 4×7 Inch Beekeeper Tool with Heat Guard & Easy Open Lid Tab, High Flow Pump for Calm Bees, Safe Hive Inspections & Honey Harvest, Burn Free Grip Design
A bee smoker is essential for calming bees during hive inspections, making it a crucial tool for beginners.
Walk into a beekeeping store (or scroll online) and you’ll see gadgets for every possible problem. Beginners don’t need most of them. What you do need is a basic system that matches your local community, so you can borrow parts, trade frames, and ask for help without translating measurements.
Most extension-style beginner programs recommend starting with the hive type most common in your region – in many areas, that’s the Langstroth hive. Standardization matters because it keeps equipment interchangeable and reduces mistakes during inspections.
Minimum equipment per colony (practical list)
Hive components (typical Langstroth setup)
- Bottom board (solid or screened)
- Entrance reducer
- 2 brood boxes (often deeps, 10 frames each)
- Frames with foundation (wax-coated plastic is beginner-friendly)
- Inner cover + weatherproof outer cover
- 1+ honey supers (often mediums)
- Hive stand (keeps the box dry and easier on your back)
Tools and safety gear
- Veil (non-negotiable for beginners)
- Jacket or full suit, light-colored and smooth fabric
- Gloves (many beginners prefer nitrile or leather early on)
- Smoker + fuel (cool white smoke, not hot flames)
- Hive tool (J-hook style is popular for frame leverage)
To compare options and sizing, InsectoGuide’s Best Bee Suits and Protective Gear for Beekeepers is a solid starting point.
A visual “buy now vs later” chart
| Buy now (first season) | Buy later (after basics) |
|---|---|
| Veil, smoker, hive tool | Queen marking kit |
| Feeder (top/frame/jar) | Fancy observation windows |
| Frames + foundation | Multiple specialty pollen traps |
| Basic mite monitoring kit | Extra supers beyond your flow |
| 2 complete hives | Honey extractor (if you harvest) |
If you plan to harvest with traditional supers, an extractor becomes relevant. Until then, it’s optional. When you’re ready, see Best Honey Extractors for Home Beekeepers.
Actionable takeaway: Spend money on safety, standard boxes, and a feeder. Delay gadgets until you can diagnose real problems.
Where to place your hive: sun, safety, forage, and neighbor-proofing
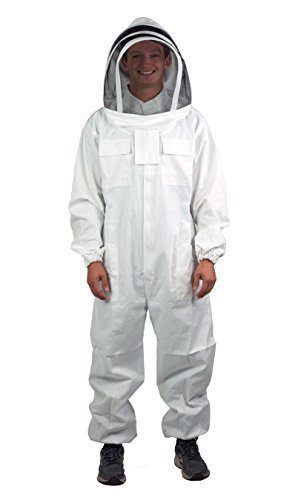
VIVO Professional XL Cotton Full Body Beekeeping Suit with Veil Hood BEE-V106XL
A protective suit is important for beginners to safely manage their hives without fear of stings.
A hive location can look perfect to a human and still be stressful to bees. Think like a colony. Bees need warmth early in the day, dryness year-round, and a clean flight path that doesn’t funnel through your patio.
A strong colony can forage over a wide area, often a couple miles when needed, but your yard still matters. Trees and flowering shrubs can provide major nectar flows, and a nearby water source prevents bees from recruiting to your neighbor’s pool.
Site requirements that prevent the most common headaches
Aim for:
- Morning sun to warm the hive and get foragers moving early
- Dry, well-drained ground with the hive slightly tilted forward
- Wind protection (fence, hedge) without trapping damp air
- A “raised” flight path – use a fence or tall shrubs to push bee traffic up and over people
- Easy access behind or to the side for inspections and lifting boxes
Avoid:
- Low, shaded, damp corners that grow mold
- Direct sprinkler spray or roof runoff
- High foot-traffic areas, dog runs, and play zones
- Areas with frequent pesticide drift (talk to neighbors who spray)
Quick placement checklist (printable-style)
- Can you stand behind the hive with a box in your hands?
- Will bees fly across a walkway at face level? If yes, add a screen or relocate.
- Is there a reliable water source you control?
- Can you legally keep bees here (zoning, setbacks, registration, HOA rules)?
Local rules vary widely, so check municipal guidance before installing bees. Many regions also encourage registration to support disease monitoring and outreach.
Actionable takeaway: The best hive site is not the prettiest spot – it’s the spot that stays dry, gets early sun, and keeps bee traffic out of human traffic.
Choosing bees and timing your first season (packages vs nucs)
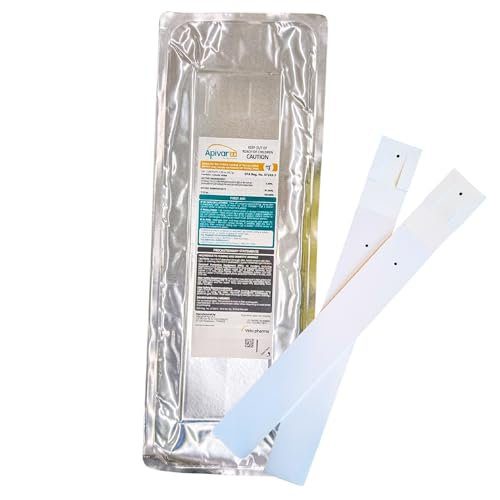
Apivar® 2.0 New Formula – Less Amitraz – Faster Varroa Mite Drop – Mite Treatment for Honey Bees, Strips Fit Langstroth, Dadant & More, No Withholding Period – (4 Packs)
This product helps in managing Varroa mites, which is crucial for maintaining healthy bee colonies.
The biggest beginner mistake is ordering bees like they’re a garden plant: “I’ll grab some when I’m ready.” In many areas, you need to reserve bees months ahead, especially for spring pickup.
You’ll usually choose between packages and nucleus colonies (nucs).
Packages
A package is a box of worker bees (often 2-3 lb, roughly 1-1.4 kg) plus a caged, mated queen.
Pros
- Widely available and shippable
- Flexible genetics options
Cons
- Slow start – they must draw comb from scratch
- Higher early starvation risk if nectar is limited
- Queen acceptance can fail
Nucs
A nuc is a small working colony on 4-5 frames with brood, stores, and a laying queen.
Pros
- Faster buildup and easier learning curve
- You can see what “healthy brood” looks like immediately
- Often better early-season survival
Cons
- More expensive
- Usually local pickup only
- Quality varies by seller
A simple decision table
| If you want… | Choose… |
|---|---|
| Fast buildup and easier first month | Nuc |
| Lowest upfront cost and easy shipping | Package |
| Locally adapted bees | Nuc or local split |
| A strong honey crop year one | Usually nuc (still not guaranteed) |
Timing tip: In temperate climates, installations typically happen in spring when pollen and nectar begin flowing (often March-May). First-year colonies often produce little or no surplus honey, even though a healthy hobby hive can sometimes make 20-60+ lb (10-30+ kg) of surplus in a good year with established comb and strong forage.
Actionable takeaway: If you can get a reputable nuc locally, it’s often the most forgiving start for beginners.
First-year beekeeping management: a realistic month-by-month plan (with Varroa in mind)
A hive isn’t a box of bees. It’s a living engine that converts nectar and pollen into new bees, wax comb, and stored food – all while defending itself and controlling temperature around 93-95°F (34-35°C) in the brood area.
Your job is to support that engine without constantly interrupting it.
The first month: install, feed, and confirm the queen
What to do
- Install your package or transfer your nuc frames into a single brood box.
- Feed 1:1 sugar syrup if natural nectar is weak or inconsistent.
- Inspect just enough to confirm the colony is queenright.
What “queenright” looks like
- Eggs (tiny white grains at the bottom of cells)
- Young larvae in a milky pool (royal jelly/brood food)
- A calm, organized brood nest
First-month inspection rhythm (simple)
- Week 1: confirm queen release (packages) and basic comb building
- Week 2: look for eggs/young larvae
- Week 3-4: ensure comb is being drawn straight and stores are present
Early summer: add space only when they earn it
Bees draw comb fastest when crowded enough to stay warm, but not so crowded they start swarm preparations. A common beginner move is adding boxes too early. That often slows growth because the colony can’t defend or heat the extra space.
Rule of thumb: add the next brood box when most frames in the current box are drawn and covered with bees.
Mid to late summer: monitor and manage Varroa before damage shows
Varroa destructor is the parasite that turns “my hive looked fine” into “my hive collapsed.” It spreads viruses and weakens developing bees. In many regions, colonies left untreated often die within a few years.
Entomologists and extension-style programs recommend monitoring mite levels and treating based on thresholds rather than guessing. A study in the Journal of Economic Entomology discussed the importance of sampling-based decisions for mite management and treatment timing.
Two common monitoring methods
- Alcohol wash (most accurate for field use)
- Sugar roll (less lethal to sampled bees, but can be less consistent)
Visual: Varroa IPM ladder (simple)
- Monitor (count mites)
- Reduce stress (nutrition, avoid overcrowding)
- Use mechanical tactics when appropriate (brood breaks, drone brood removal)
- Treat with approved products when thresholds are exceeded
- Re-test to confirm results
For a practical first-year schedule that many beekeepers reference, see the guidance at Scientific Beekeeping.
Fall and winter prep: stores, moisture, and a last mite check
Most winter losses trace back to two things: mites and starvation. Moisture is the third, especially in cold climates.
Winter prep checklist
- Confirm adequate honey stores (often 40-70 lb or 18-30 kg, depending on region)
- Reduce entrances and add mouse guards if needed
- Ensure ventilation to reduce condensation
- Plan emergency feed (fondant or dry sugar) if your winters are long
Actionable takeaway: Treat Varroa like a predictable seasonal problem, not a surprise. If you wait until bees look sick, you’re late.
Safety, stings, and common myths that trip up new beekeepers
Bees sting. Even gentle colonies sting, and protective gear reduces risk but never removes it. Medical reviews estimate 0.4-0.8% of people have systemic allergic reactions to stings (anaphylaxis), while milder reactions are much more common.
If you or someone in your household has a history of severe allergic reactions, talk to a clinician before keeping bees. Many experienced beekeepers also keep an epinephrine auto-injector on site, especially when working alone.
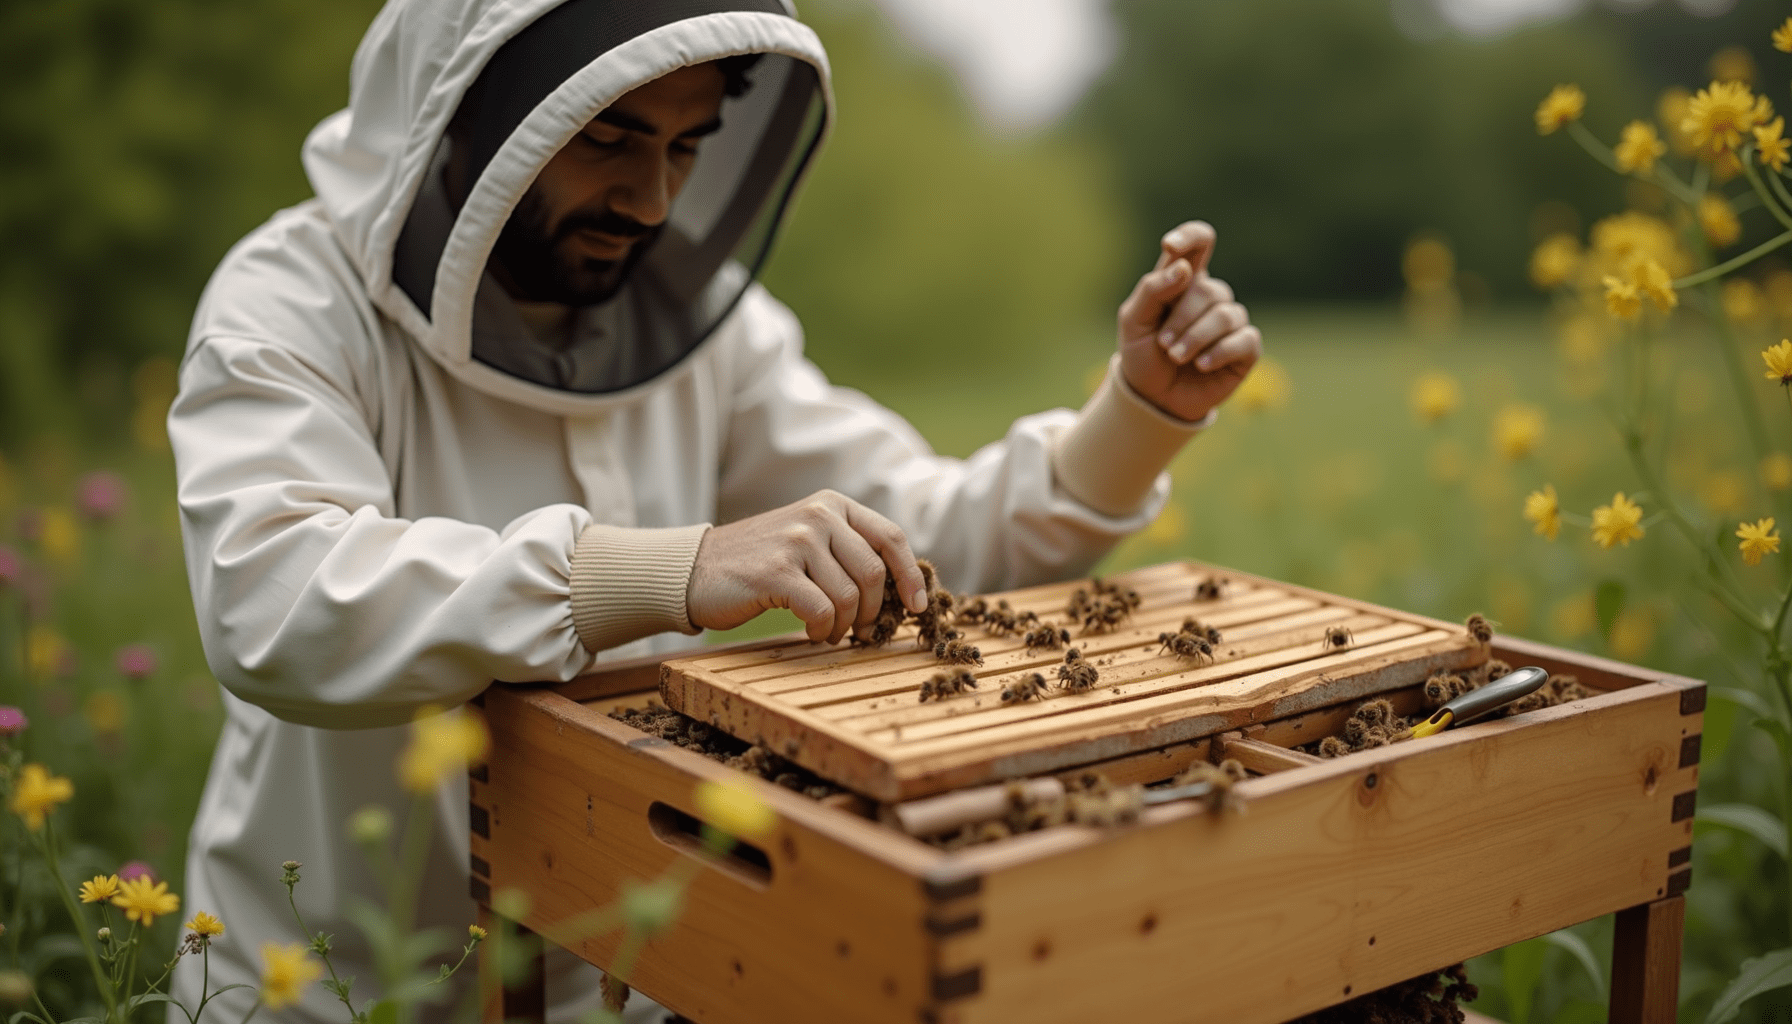
How to inspect without turning the hive defensive
Bees read your movements and vibration like body language. Smooth, slow motions matter.
A calm-inspection routine
- Choose warm, calm weather (often above 60°F / 15°C).
- Use a few puffs of cool smoke at the entrance and under the lid.
- Lift frames slowly and keep them over the hive body.
- Have one goal per inspection: queen status, food, space, mites.
Visual: “One-goal inspection” menu
- Eggs present?
- Brood in all stages?
- Enough pollen and nectar/honey?
- Any queen cells forming?
- Any disease signs (spotty brood, odd odors, deformed wings)?
Myth check (what beginners hear vs what’s true)
| Myth | Reality |
|---|---|
| “Bees are set-and-forget pets.” | Colonies need active management, especially for Varroa. |
| “Keeping honey bees automatically saves bees.” | Honey bees are managed livestock. Wild pollinators need habitat and pesticide reduction. |
| “Natural means never treating mites.” | In many areas, never treating leads to high losses and can spread mites to nearby hives. |
| “All stinging insects near the hive are bees.” | Yellowjackets and wasps are often the real culprits around food and trash. |
For learning support, a clear, local beginner text can shorten your trial-and-error phase. InsectoGuide’s roundup of Best Beekeeping Books for Beginners is a good place to start.
Actionable takeaway: Plan for stings like you plan for sunburn – avoidable much of the time, but never impossible.
Practical feeding and nutrition: keeping colonies from starving (without overdoing it)
New beekeepers often picture bees living entirely on flowers. In reality, colonies can hit sudden food shortages from rain, drought, or a gap between blooms. Comb-building also burns energy fast, especially for packages starting on bare foundation.
Feeding is not “cheating.” It’s normal animal care when forage is insufficient.
When to feed (common situations)
Feed 1:1 syrup (by volume) when:
- You install a package and need rapid comb drawing
- Cold or rainy weather blocks foraging
- Your area has a known nectar dearth in early summer
- You’re correcting light stores after splitting or requeening
Feed thicker syrup (2:1) in fall in many climates when:
- You need to help colonies top off winter stores quickly
- Nights are cool and evaporation is slower
A quick feeder comparison chart
| Feeder type | Best for | Watch-outs |
|---|---|---|
| Top feeder | Big volumes, less robbing | Leaks drown bees if poorly designed |
| Frame feeder | Simple, inside hive | Can drown bees without floats |
| Jar feeder (entrance/top) | Cheap, easy | Entrance jars can trigger robbing |
Protein matters too. Bees need pollen (or substitutes) to raise brood. If your area has long pollen gaps, supplements can help, especially for early spring buildup.
If you’re choosing feeders or pollen patties, InsectoGuide’s guide to Best Bee Feeders and Pollen Supplements for Healthy Bees can help you match gear to your climate and hive style.
Actionable takeaway: Starvation can happen fast during comb-building. If you’re unsure, lift the back of the hive and learn what “light” feels like.
Conclusion: the simplest path to successful beekeeping
Beekeeping goes well when you treat it like seasonal animal care, not a one-time setup. Start with two colonies, use standard equipment, pick a sunny and safe location, and keep inspections purposeful. Most importantly, monitor Varroa and respond early, before mites and viruses quietly shrink your winter bees.
Next step: build your shopping list and learning plan. Start with Best Beekeeping Starter Kits for Beginners and then choose protective gear from Best Bee Suits and Protective Gear for Beekeepers so your first inspections feel calm and controlled.
As an Amazon Associate, I earn from qualifying purchases. Product recommendations are based on real reviews and independent research.